
Have you ever tried to download an app from the App Store, only to find that This app is not available in your country or region. I’ve been there. It’s one of those moments when you realize how much your App Store country setting matters. Whether it’s a must-have app that’s exclusive to another region or you’ve recently moved to a new country, knowing how to change App Store country on your device can save you a lot of headaches.
In this guide, I’ll walk you through situations that you might need to change your App Store country, how to do it step-by-step, and some common roadblocks you might encounter along the way. Plus, I’ll share a few tips on when you might not even need to change your App Store country at all. Let’s dive in!
Why Change Your App Store Country?
Changing your App Store country isn’t something you do every day, but there are situations where it becomes absolutely necessary.
Here are a few examples:
- Accessing Region-Locked Apps: Some apps are only available in specific countries. For instance, I once wanted to download a language-learning app that was only available in Japan. Without changing my App Store country, there was no way to access it.
- Moving to a New Country: If you’ve relocated to another country, you’ll likely need to switch your App Store region to match your new location. This ensures you can access local apps, services, and payment methods.
- Exclusive Deals or Features: Sometimes, apps or games release features or special offers that are only available in certain regions. I used to do this just because the Pokémon Trading Card Game (TCG) was first released outside of my country. If you’re a gamer, you know how frustrating it can be to miss out on exclusive content just because of your location.
Whatever your reason, changing your App Store country can open up a world of possibilities—but it’s not always straightforward.
How to Change App Store Country on iPhone, iPad, or Mac?
There are two main ways to change your App Store country: using your current Apple ID or creating a new Apple ID for a different region. Let me explain both methods in detail.
1. Change the Country with Your Current Apple ID
If you want to switch your App Store country without creating a new account, here’s how to do it:
On iPhone or iPad:
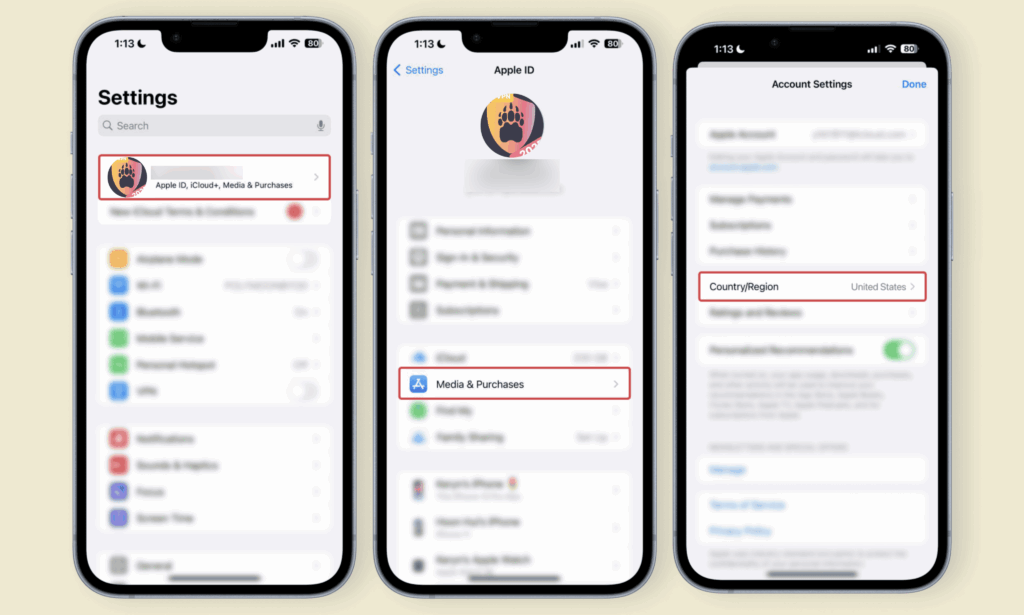
- Open the Settings app.
- Tap on your name (Apple ID) at the top.
- Select Media & Purchases > View Account.
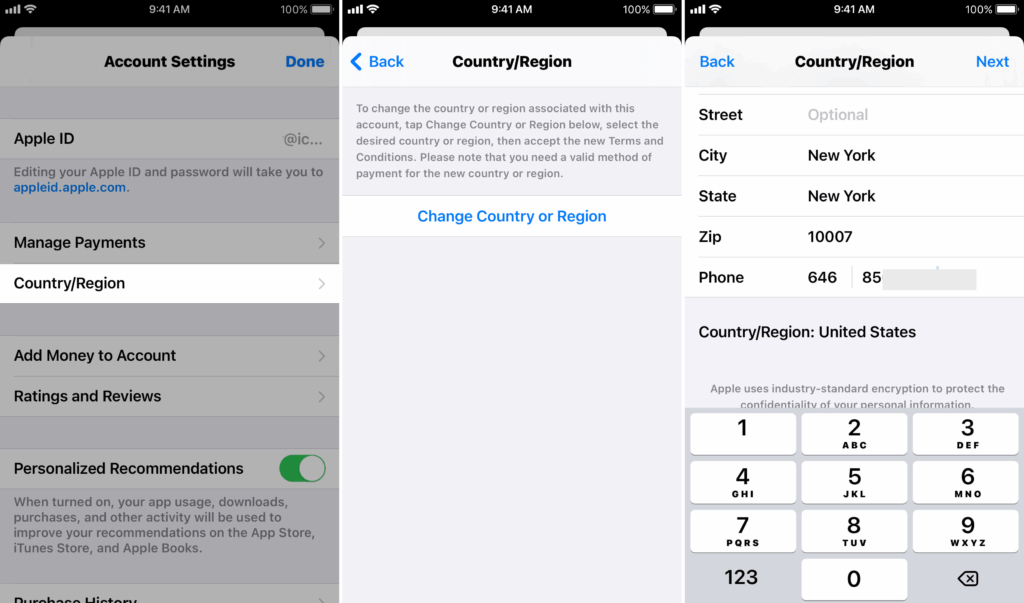
- Tap Country/Region > Change Country or Region.
- Choose your new country from the list.
- Agree to the terms and conditions.
- Enter a valid payment method and billing address for the new country.
Or you can simply open the App Store and set your account region directly.
On Mac:
- Open the App Store app.
- Click on your profile at the bottom left.
- Select View Information.
- Under Account Information, click Change Country or Region.
- Follow the same steps as above to choose a new country and enter payment details.
Important Note: You’ll need to spend any remaining balance in your Apple ID account before you can switch countries. More on that later!
2. Create a New Apple ID for a Different Region
If you don’t want to mess with your current Apple ID, you can create a separate one for the region you need. This is especially useful if you only need temporary access to another country’s App Store.
Here’s how:
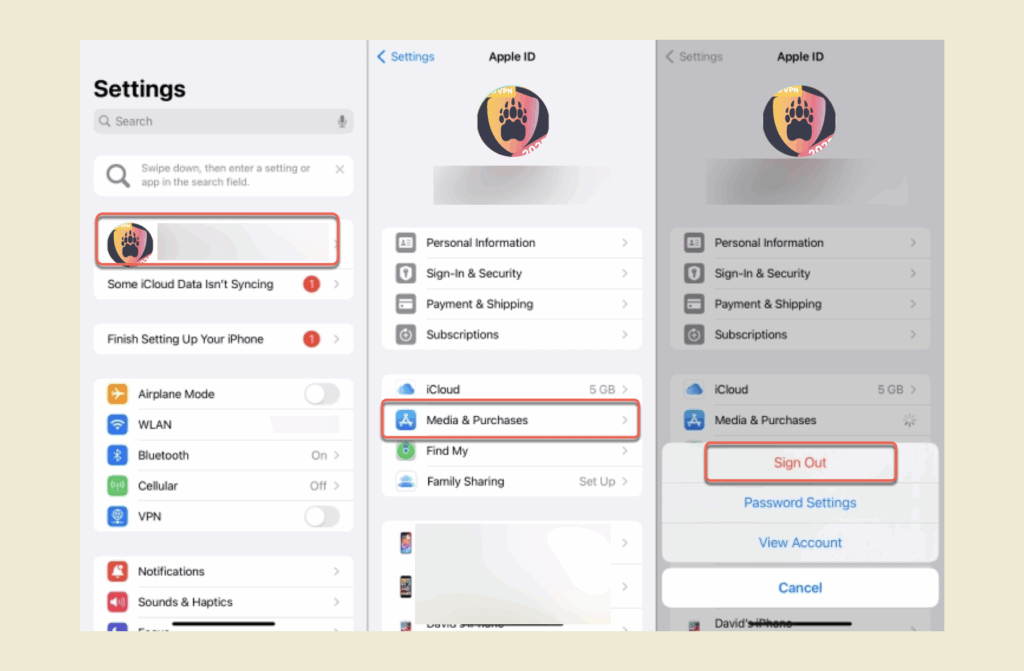
- Go to appleid.apple.com and create a new Apple ID.
- During the setup process, select the country or region you want.
- Use a valid email address that’s different from the one linked to your current Apple ID.
- Sign Out of your Old Apple ID in the App Store.
- Sign in to the App Store with your new Apple ID on your device.
This method is great because it doesn’t affect your primary Apple ID, but switching between accounts can be a bit of a hassle.
Why Can’t I Change My App Store Country?
Sometimes, you might run into issues when trying to change your App Store country. Here are the most common reasons why:
1. Active Subscriptions: If you have active subscriptions (e.g., Apple Music, iCloud, or app subscriptions), you won’t be able to change your country until you cancel them.
Solution: Wait for your subscriptions to expire or consider using a new Apple ID for the new region.
2. Remaining Balance: If you have store credit left in your account, you’ll need to spend it before switching countries.
Solution: Purchase something to use up the remaining balance. If it’s a small amount, consider adding funds to make a purchase that matches the total.
3. Family Sharing: If you’re part of a Family Sharing group, you can’t change your country until you leave the group.
Solution: Leave the group temporarily, change your country, and rejoin later.
Can You Change App Store Country Without Cancelling Subscriptions?
Unfortunately, No. Apple requires you to cancel any active subscriptions before changing your App Store country. This is a major inconvenience, especially if you rely on services like Apple Music or iCloud.
One workaround is to use a second Apple ID for the new country. This way, you can keep your subscriptions on your primary account while accessing apps from another region with the secondary account.
How to Change App Store Country with Remaining Balance
If you have a small amount of store credit left, Apple won’t let you switch countries until it’s gone.
Here’s what you can do:
- Check your balance in the App Store.
- Purchase something that matches or exceeds the remaining balance.
- If the balance is too small to buy anything, contact Apple Support—they may be able to help you clear it.
When You Don’t Need to Change Your App Store Country
Sometimes you just need to change your location on iPhone, changing your App Store country isn’t worth the hassle. If you only need access to a region-locked app, for instance, TikTok, using a VPN like BearVPN can be a simpler solution.
For example, if you’re trying to access a streaming app who videos are only available in another country, connecting to a VPN server in that region might do the trick. Keep in mind, though, that this won’t work for all apps—some require a matching App Store region to download.
Conclusion
Changing your App Store country can feel like jumping through hoops, but it’s often necessary if you want access to apps or services that aren’t available in your region. Whether you’re moving to a new country or just trying to grab an exclusive app, the steps above should help you navigate the process smoothly.
That said, it’s not always the best solution. If you’re dealing with subscriptions, remaining balances, or other restrictions, consider using a secondary Apple ID or a VPN like BearVPN instead.
At the end of the day, it’s all about finding the method that works best for your situation. I hope this guide has made the process a bit easier to understand. If you’ve got any tips or experiences of your own, feel free to share them in the comments below!


